Raising Caterpillars – Update 7, Releasing the Butterflies

butter1

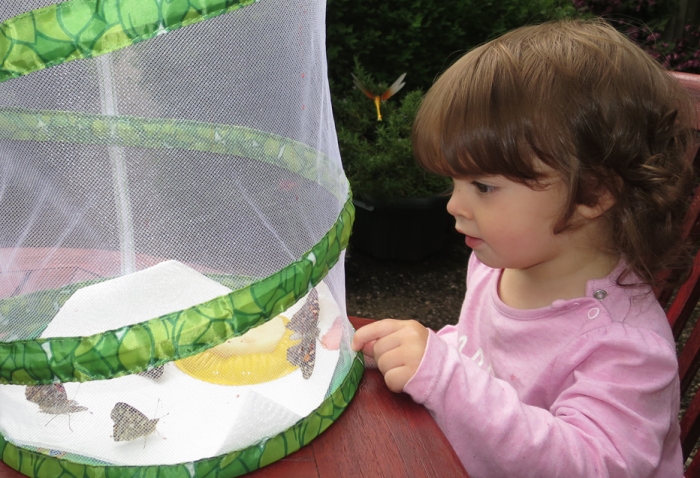
Well, today was the big day! It was warm and even sunny in patches, so we knew we really needed to release our butterflies in case the weather didn’t hold out for the weekend (I live in the north of England, and getting 2 days of sunshine in a row is regarded as something in the order of a minor miracle).

At first we took the butterflies outside in their enclosure, so they could acclimatise to the weather. Soon they were fluttering and flying, so we opened the lid. Two of the butterflies wanted nothing more to do with us and flew straight off over the houses, but the other three were more hesitant to go.

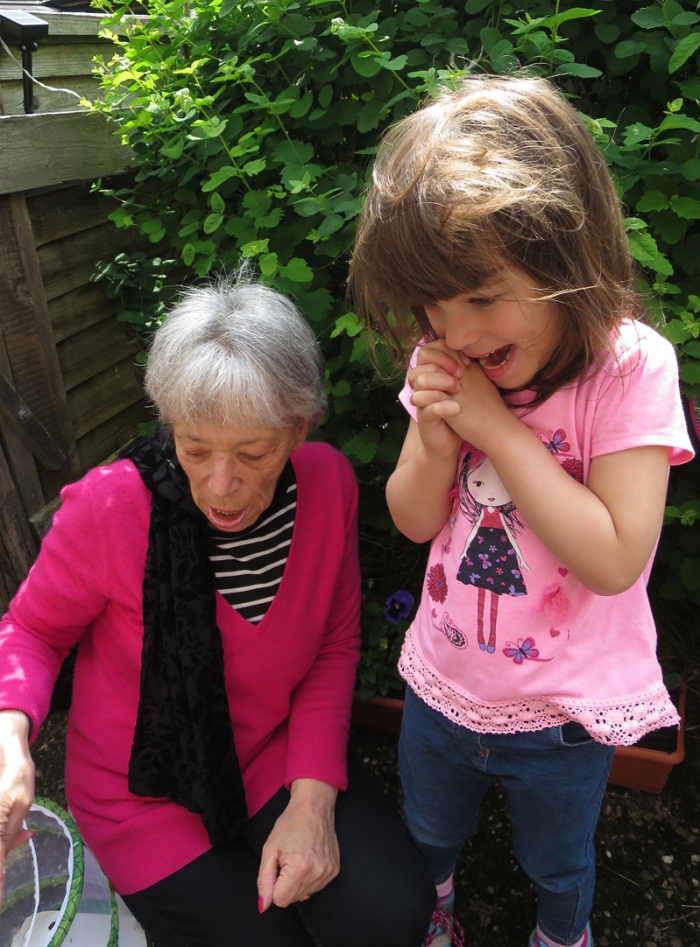
Amelia was wearing a butterfly patterned top and our butterflies must have thought some friends had come to greet them as, to her delight, two of them fluttered straight onto it!

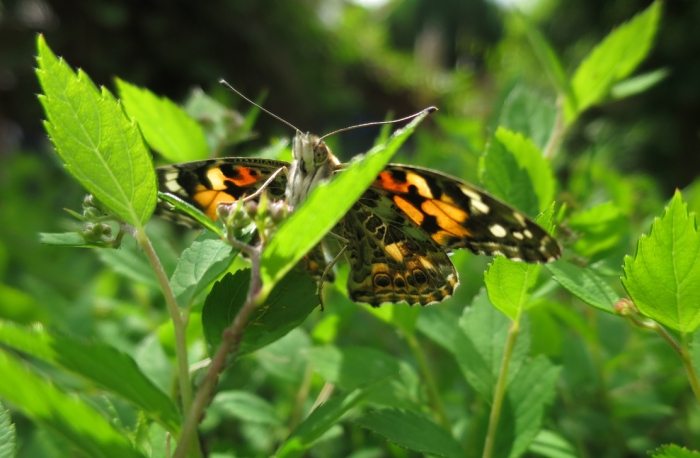
Another butterfly fluttered away fairly quickly, and we placed the remaining two onto a leafy bush to finish warming their wings in the sunshine.

It’s been such an amazing experience for all of us. I thought Amelia would have been sadder about letting the butterflies go, but in the end she was just excited about them landing on her top, so we were pretty lucky there.

butter0butter4


Raising Caterpillars – Update 6, Day 31

look2_edited-1.jpg

Four of our five caterpillars have now turned into butterflies! We’re planning on giving them another couple of days to see if the last one emerges and then releasing them into the wild.

Apparently Painted Lady butterflies will naturally “migrate” from where they are released to their native habitats (at least that’s what the Insect Lore info sheet says). I don’t know whether this is actually true, or just one of those things they tell to kids to make them feel better, whereas in reality the poor things will spend the rest of their short lives weaving aimlessly through traffic in the centre of urban Manchester – but, hey, they said the chrysalids on the ground would be OK and so far they have been right, so maybe it’s time to suspend my natural skepticism and accept they know what they are talking about!

chrysalis
Ready to emerge

Watching the transformation so close up has been truly amazing. I took this photo of one of our chrysalids just minutes before the butterfly emerged – and you can actually see the butterfly’s wing inside!

Our butterflies seem to be enjoying their plates of fruit salad, although I’m sure they will ultimately be happier to be released into the wild (presuming what I said above is true, anyway!)

It’s been a privilege to share our house with such a wonder of nature, and over the next couple of days we will be sure to take in every detail before saying goodbye to our fluttering friends.


Raising Caterpillars – Update 5, Day 29

butterfly1_edited-1

What a happy day; we have our first butterfly! 🙂

It must have emerged really quickly,butterfly3 
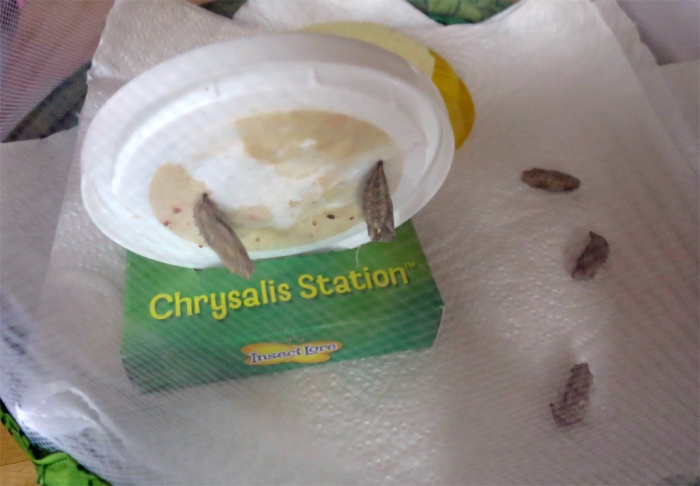
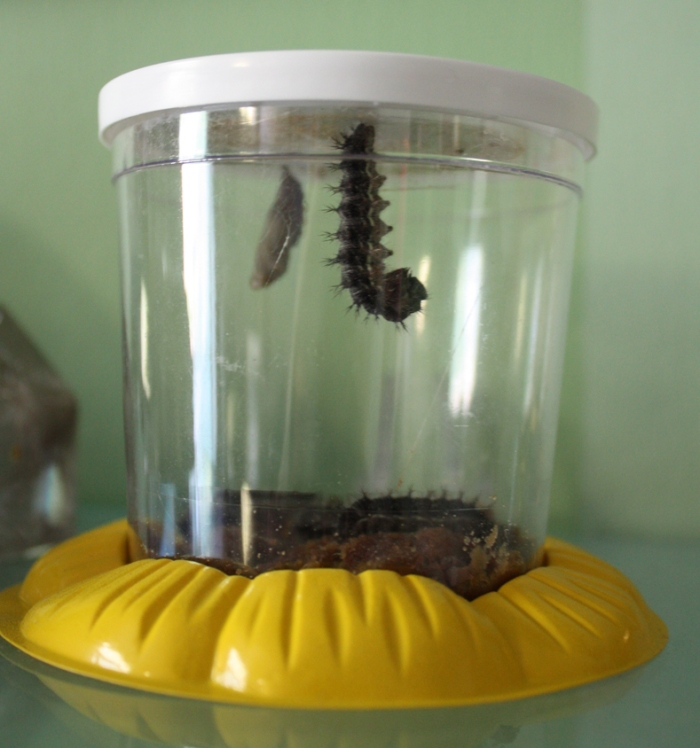
as I looked before we went out to the shop this morning and the chrysalis was intact, then we came back half an hour later and there it was sitting next to its empty chrysalis shell, airing out its new wings.

We’ve given it some buttercup stalks to climb on, sugar water to drink, and also a little plate of fruit salad (well, it might as well get off to a healthy start!)

Hopefully in another day or so it will have some new butterfly friends to flutter around with too…

Oh, and don’t worry, the red stuff under the butterfly isn’t blood, it’s meconium (metabolic waste that is expelled from the butterfly as it first emerges – a bit like a human baby when it does its first poop!)

butterfly4
Stretching its wings

butterfly2

Raising Caterpillars – Update 4, Day 22

Chrysalis down!

chrysalisdown.jpg

We’ve had a bit of trouble with our caterpillars since the last update. Two of our caterpillars successfully pupated on the lid of their container, but then as the next two tried to do so the final caterpillar crawled across them and all three fell in a heap to the floor. The two that had been knocked finished pupating on the ground that day, and the last one did so that night.

Now, I’ve been reading what you are supposed to do in these circumstances and getting a bit concerned. A lot of sources say that the chrysalids will not form properly on the ground, or the butterflies will not be able to emerge, and they talk about trying to “rehang” the chrysalids with dental floss or hot glue. However, the official Insect Lore site (where I purchased the larvae) says to leave them down, placed on kitchen towel, and they should emerge safely. So, that’s the advice we’re following, and basically hoping for the best.

I’ve placed all the chrysalids in their butterfly mesh habitat, and now all we can do is wait…

(Getting kind of worried over what will happen, though. The little things are like pets to us now, plus I really don’t fancy having to explain malformed butterflies and the like to my 4 year old. She is bad enough with dead stuff right now. Yesterday she turned to me and said “mummy, you’re so old you could die right now”! Gee, thanks, do I look that bad? I’m only 35!)

Butterfly Glitter Soaps

soapLittle Miss (4) wanted to make a present for our lovely next door neighbour who has been baking all our pottery in her kiln, so we decided to try our hand at soap-making. I decided to use a melt and pour base as it is simplest and safest with small children around (the melted soap gets very hot and needs to be handled by an adult, but there’s still a lot that children can do to get involved). Here’s what we did:

ingredients_edited-1.jpg

You’ll need:

  • Melt & pour soap base (I used a clear and a white one)
  • Soap dyes
  • Soap fragrance, or essential oils
  • Soap mold (plastic or silicone)
  • Cosmetic glitter
  • Microwave-safe container
  • Wooden or silicone stirrer
  • Sharp knife

Method:

First we chopped a small piece of white soap base into tiny chunks and set these aside.

Next we selected our colours and fragrances and got these ready, as I knew we would need to work quickly once the soap base was melted.

I cut around 4oz of soap base from the transparent block, cut it into half inch cubes and put these in a microwaveable bowl. Next I melted this in the microwave in 20 second bursts at full power until fully liquid. (I’ve since read that you are supposed to cover the container with saran wrap – but we didn’t and it turned out fine).

I poured half of the soap base into a separate bowl (so we could make 2 colours at once) and allowed these to cool slightly.

Next Amelia added fragrance, colour and superfine glitter to each bowl. (Be careful if you let young children help with this stage as the soap will still be VERY HOT.) We made a rose scented pink soap, and chocolate scented blue one! I’m sure there is some formula for how much to add, but we just kept going until it looked and smelled good. It’s also important not to over-stir the mixture or you will introduce bubbles into your soap (these can apparently be dispersed with rubbing alcohol, but we didn’t have any).

Finally we poured the molten soap into our butterfly mold, adding the reserved pieces of white soap base for an attractive effect.

We left the soap to cool for a few hours at room temperature then turned out of the mold and left to harden fully overnight.

The soaps smell gorgeous, and I can’t wait to try out other colours and designs – I think I might just have found a new hobby! 🙂


Raising Caterpillars – Update 3, Day 18

chrysallis.jpg

Yay! We now have one chrysalis, and another caterpillar hanging down from the lid in position ready to transform. The other 3 don’t seem to be doing very much, but I’m sure they will soon (they had better get a move on, as the food supply seems to be running low, and the ground now seems to comprise more of caterpillar droppings than anything else!)

It’s funny, but I’ve never really liked caterpillars much, even gone out of my way to avoid them – but seeing them here in my home they’re kind of cute! I love watching them crawl around and eat and grow, and find myself really caring about our fuzzy little creatures. OK, I’m still feeling slightly apprehensive about actually handling the things to move them to their butterfly habitats (have you seen chrysalides wiggle? what if one wiggles so much it drops off onto the floor?) but I’ve certainly grown a new appreciation for them. (Can’t say the same for my husband, though, who still insists caterpillars are “creepy” and “unpleasant”!)

4-year-old Amelia is fascinated by our wriggly new pets, and even 16-month-old Ciara has taken an interest, pointing at the beaker whenever she wants to be lifted up to see them. I knew it would be a good home activity, but it’s really captured their interest in a way I’d never imagined (Amelia’s even says she’s making her own book about the caterpillars). Definitely an activity I would recommend to other families with young children (or even without, as I am enjoying it at least as much as the kids and learning as many new things too!)

Tissue Paper Butterfly Suncatcher

Tissue Paper Butterfly Suncatcher

After a few gorgeous days of spring sunshine it’s now chucking it down with rain over here. So, I thought, what better way to brighten up a dismal day than a beautiful rainbow butterfly suncatcher?

You will need:

  • Black card
  • Craft knife
  • Tissue paper
  • Sticky-backed plastic
  • (and white paper, glue & scissors, if you want to use a printed template)

First you’ll need a butterfly template. If you’re feeling artistic you can draw one yourself, but I just searched online and found one here. I enlarged it to A3 size, then mounted the print-out on black card (had to do this in 2 pieces, as I only have an A4 printer).

Next, cut around the lines with a craft knife. This bit takes a little patience, but is well worth it.

Stick your butterfly cutout to a sheet of sticky-backed plastic and start filling in the gaps with tissue paper (we cut most of ours into triangles first, although Amelia also cut some random shapes which made a rather nice effect).

butterfly6
Looks great on the window!

Once you’re done, cover the complete piece with another sheet of sticky-backed plastic on the back to seal it together. At this point I was going to cut around the butterfly shape, but Amelia didn’t want to lose her “special decorations” on the outside, so I cut it into a rectangle instead. I actually love the effect this makes – like the butterfly is flying through a cloud of confetti!

And it really does brighten up the room.

The caterpillars have arrived!

IMG_6891
The tiniest of caterpillars

Little Miss loves butterflies, and today she got a surprise package in the post today – 5 teeny tiny Painted Lady caterpillars that we can watch grow and transform from our very own home! At first she didn’t look too impressed, but as we talked about the beautiful creatures they would become, and as they began to crawl around in the jar, her interest certainly grew. Now she is very excited at the idea of having the butterfly habitat in her room (good thing, really, as my ever encouraging husband – yes, the same one who hates playdough – has banned them from the front room, declaring that he refuses to share his living space with a “dirty chrysalis”!)

I’ll post an update as soon as they do anything noteworthy (or noteworthy for a caterpillar anyhow!).


Marbled Paper Butterfly String

mobile
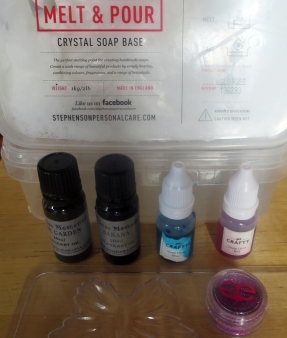
Remember the decorative paper we made a few days ago with Shaving Foam Marbling? Well, I decided to use some of it to make this pretty hanging garland. I drew around cookie cutters as a template for the butterflies and hearts, cut them out and mounted them on sugar paper (six of each, so I could make the garland double sided). I then cut the shapes out with their sugar paper borders and hot glued the yarn to the back of 6 of the pieces. I used PVA glue to stick the remaining pieces to the hot glued ones to form the other side of the string.

It looks great hanging in my daughters’ pretty pink room.

I imagine these would also look really good with some large-hole sparkly beads threaded onto the string at various places, but I didn’t have any around to experiment with today. Maybe that will be a project for another day…